
Special thanks to the PHB.
Table of Contents:
Episode 1: Into the Deep
Upon arriving on the island, you’ll find that a filmmaker named Cam Jameson needs your help! Cam needs you to shoot underwater scenes for a movie he’s making.

Click Start, and you’ll automatically go talk to him. He’ll give you his Sea Creature Files.

Open up the files, and inside you’ll find information and pictures for various sea creatures. Read the info carefully, because they’re clues on what to do. Here they are for reference (click to enlarge):


After reading the files, jump up to the top of the boat and talk to the guy with a beard and hard hat. He says you can’t get the key yet – but wait, there’s a bucket above his head! Get to it by scaring away the bird on the pole on the right side of the boat.

Now climb up. You can now jump to the ledge. Pick up the Empty Bucket!

Once you get the Empty Bucket, hop down and click on the octopus. He’ll squirt some ink into the bucket and you’ll now have a Bucket of Ink.

Climb to the ledge once more and use the Bucket of Ink while standing on the ledge. You will pour the ink all over the man with the key, and he will drop the key. You can then pick up his Key while he frets over his messy helmet.

Return to Cam Jameson (the director of the underwater movie), then hop over to the crate containing your “Bubble” submarine pod. Click it to open the lid, and then click once more to hop inside the sub.

Sea dragon
Once you are underwater, you can move around by dragging your mouse. The first creature that you need to find is the sea dragon, and it can be found in the area you’re at right now. He’s hiding in a patch of seaweed.
Make him come out by nudging him a bit, then click on him, and let your sub pod record some Sea Dragon footage. If he slips away, he’ll just be on the other side of the area, hiding in a bush.

Stone fish
After you film the sea dragon, go near the bottom of the area you’re in to go to the next one. This terrain is a little deeper, and whenever you hit a wall, the sound is outrageous, so be warned. 😉
The next fish you will need to find is the stone fish. He will be hiding on the bottom right of this area, but he won’t show his face long enough to take a decent video. Hide in the seaweed next to him and wait for him to come out. You can then discreetly click to film the Stone Fish without him even knowing (although he’s looking straight at you and you’re shining light into his face 😛 ).

Cuttle fish
After you finish that illogical scenario, float up a bit until you find the cuttle fishes’ hideout. There are multiple cuttle fish here, but you need to get footage of the rare purple one.
There is a problem, however, and your job will not be so easy. The purple cuttle fish only shows up in the red seaweed. There is only one purple cuttle fish, and only one red patch of seaweed. You have to guide it to the top, one patch at a time. Use the picture below if you need help on the arrangement of all the cuttle fish in order to snap footage of the purple Cuttle Fish.

Once you have him filmed, you can make your way to the left side of the area.
Barreleye fish
You will find a barreleye fish inside an underwater tunnel. (This thing looks like something from your nightmares!) You must clog various pipes in order to blow the fish along the tunnel and out the other side of it. The pipes are blowing out a strong gush of air, so don’t get near the front of them — instead, near them from the side and then click, moving your sub close enough to clog them.
Here’s a map with some arrows to help you out:

After you get some footage of the Barreleye Fish, continue to the next area.

Angler fish
You’ll find the angler fish about halfway down this area, hiding in a little cave. You won’t be able to get her to come out for very long, so swim around the area and collect tiny fish to swim around your boat. You need about 3 fish following you in order to successfully record the angler fish.
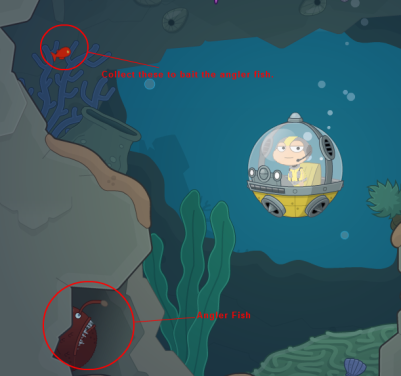
While collecting the fish, remember not to bump into the purple urchins that will scare away them away. When you’ve got about three fish following your boat, go back to the Angler Fish and let her eat the other fish while you record her.
(Note: the area left of this one is just an ad, and you don’t need to go there to complete the quest.)

Hydromedusa
Now return to the reef. When you get there, you will see an ultra rare Hydromedusa! The director encourages you to follow it in order to film it, so follow it into the next area.

The place that you end up in is a ledge leading to the deepest waters. The Hydromedusa will be floating above the pit. Make your way over to it and click on it to snap a picture. When you do, a gang of Hydromedusas will come over and shock your sub, making it lose its power, and you’ll fall into the deepest waters…

When you reach the bottom, you won’t be able to swim up because of the pressure. Slowly make your way to the right… and here you’ll make a huge discovery. It’s the mythical underwater city of Atlantis! You’re going to need a bigger lens to finish this expedition…

At this point, you will be awarded the island medallion for Episode 1 and be left with the mystery of Atlantis — what will you find in the adventures ahead?

Episode 2: Fortress of the Deep
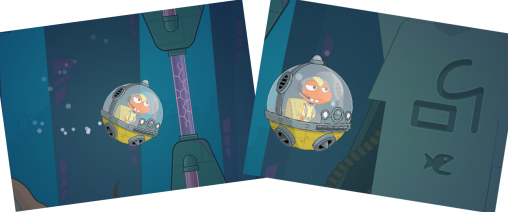
Upon starting the second episode, you’ll find yourself entering the mysterious alien ship that you found in episode one of Mission Atlantis. Once inside, you’ll be blocked by a purple glass wall.

To get past the purple glass wall, ram your submarine into the wall until it breaks. You have entered the scene known as the alien area. Once you break the glass, you’ll find a strange glyph on the wall. Click it to get a snapshot of it. Continue right and you’ll find that there is a strange circular door consisting of three panels of icons: one with a shark, one with a jellyfish, and one with a puffer fish.
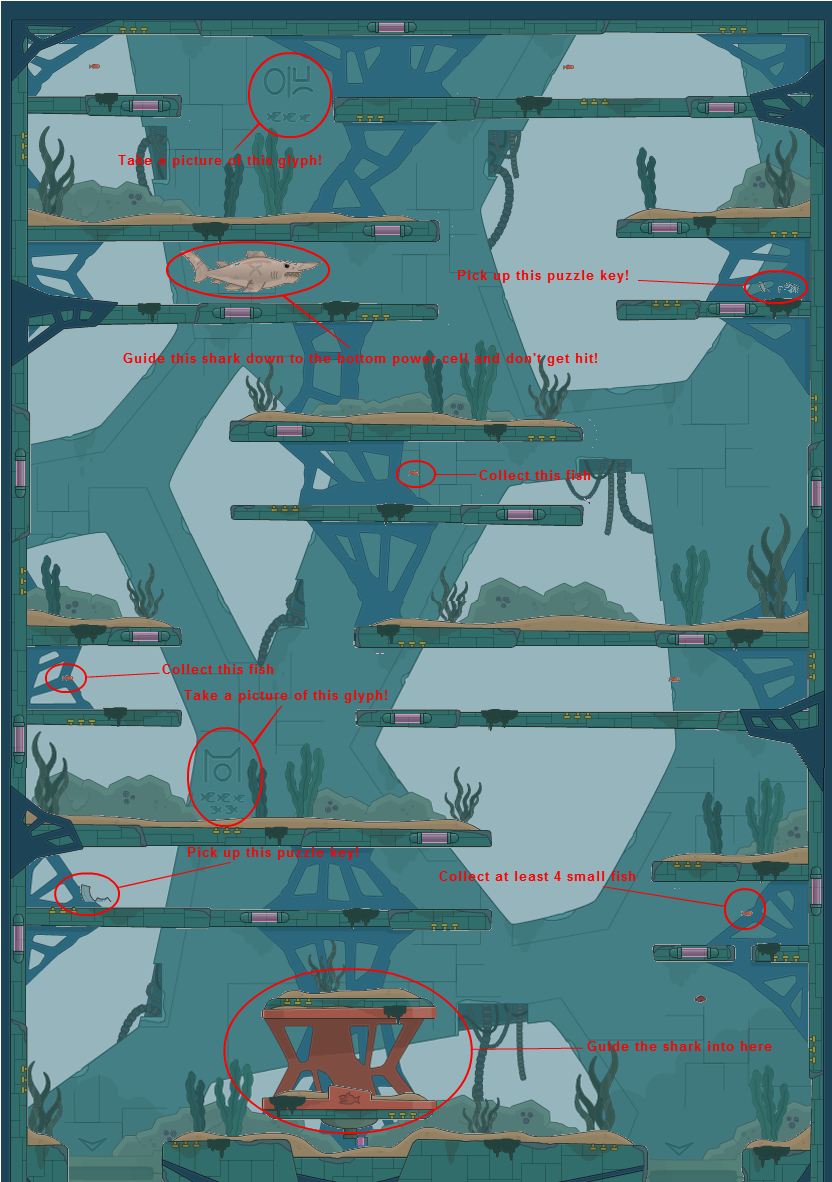
Shark area
Going up from the alien door area, you’ll find yourself in a dark and rather creepy place. Cam will acknowledge the creepiness and he’ll tell you that he has a feeling something bad is nearby. (You can pretty much tell what it’s going be by the title of this section.) Go around and break the glass, collecting at least 4 cute little fishies to travel along with. As you make your way up, suddenly, a shark appears in all of its scary glory. Now’s a good time to swim down!
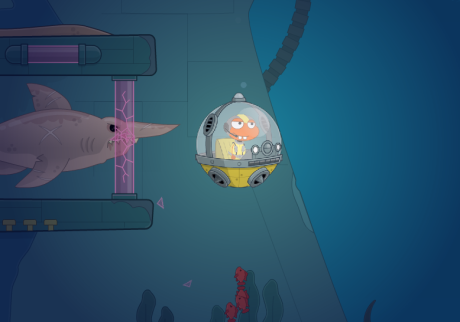
As you try to swim down away towards the cage, the shark will eat some of the fish you lured with you, and when you finally reach the cage, the shark will be locked up and you’ll get your first energy source! Along the way, you’ll also see two glyphs you should snapshot and two puzzle key pieces. The two puzzle keys are hidden in two walled-off areas. One down, two to go. Use the photo below for reference (click to enlarge).
Hydromedusa area
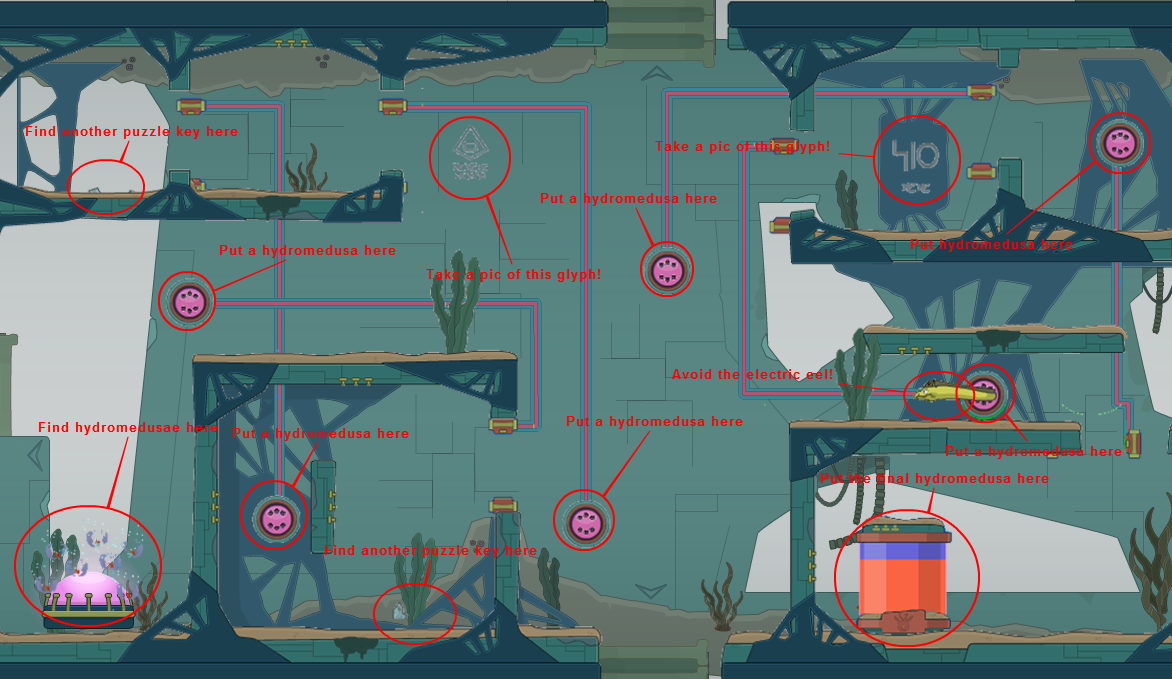
The objective in this area is to connect all of the hydromedusa (jellyfish), which surround a glowing ball on the bottom left corner of this area, to outlets all around the area.

You can do so by moving close to the hydromedusa culmination, thus making one of them follow you. Lead it to one of the 6 outlets and then let it find its way to them. After connecting, the each outlet will unlock a different door in the maze. Inside, you will find more outlets (to connect the hydromedusa),glyphs (to take snapshots of), and puzzle keys (to pick up).
After connecting 6 hydromedusa, lead the last to the power cell in the bottom right corner of the area. You can use the picture below for reference (click to enlarge).
Puffer Fish area
In this area, you’ll be confronted with a pipe challenge — rearrange the connectors to make the pipes connect from one end to the other. You can then press the big red button on the right side of the page to suck a puffer fish through the pipes and into the power cell.

You may have noticed that there are two puzzle keys stuck in separate pipes — to collect them, rearrange the pipes once again to blow them out.


You also won’t want to miss the glyph in the bottom left corner of your screen – take a picture of it!

Assembling the Key
So now you’ve got all the puzzle pieces! Go into your inventory and “Assemble” the pieces. You will then have to lock into place each of the pieces until everything fits into a perfect circle. After assembling the key, close the window and go back to the alien door.

Once you get there, click the strange-looking seat next to the door.

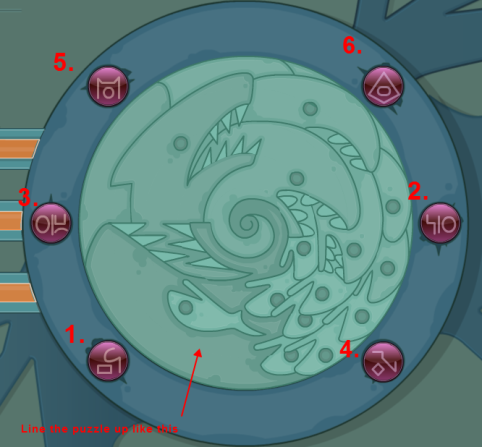
There, you’ll place your circular key. Turn each ring of the circle until it matches each other. Then, using the mysterious glyph files, press the glyphs buttons in their proper order — see the picture below for reference:
Now, the alien door will open up, sucking your bubble sub into the unknown. As the story concludes, Cam receives a mysterious message in an alien language from an unknown entity. The episode concludes, leaving us to wonder about its identity…

Congratulations, you have completed Mission Atlantis: Fortress of the Deep! Hopefully whatever is on the other side is friendly…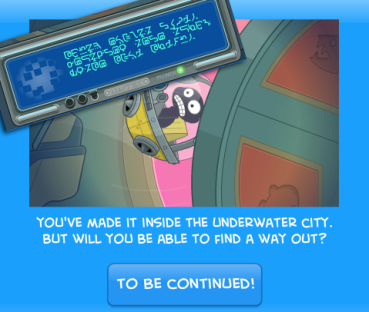
Episode 3: Out of the Blue
After being sucked into the city, you’ll find yourself unable to contact Cam Jameson. Well, since we don’t want to be stuck inside an undersea fortress for the rest of our lives, we should find a way out.

Go to the right. And I mean all the way to the right until you reach the area just after the room with multiple weird cages: the laboratory. This will take you through the main deck. While in the main deck, you will receive a cryptic message. Continue right.

Once in the laboratory, go up one scene, landing you in the living quarters. Go around the sphere and traverse until you see a green button on the ground. When you click on it, a green power disk will pop up. It is your duty to push this green power disk to where it goes into – elsewhere in that certain area.
In this area, take the green disk up and around the large alien sphere in the center and you’ll find the power charging station. Push the green disk into it and you’ll be treated to a series of visions. You’ll swear you see a starship in the sky…dinosaurs(?)… and a rat? The mysterious messenger then contacts you with an alien message, and you realize that this person talking isn’t Cam Jameson. Okay then…
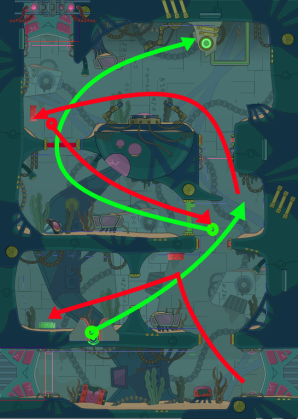
Now that you’ve activated that power source, you have to push the red button above you to get out the room. Go down and exit the area. (Use the picture below for reference – the red arrows are where you should go, and the green arrows are where you need to hit the disk.)

When you go down into the cage area, you’ll find a ginormous sea creature trapped in a cage much too small for him. (I don’t see that backfiring anytime soon.)

Go left into the main deck and you’ll find that you can push those red buttons in that area now. Go up and press the first red button you see. Go to the left and summon the green power disk by clicking on the green button again. Bringing the disk, go to the right, press the red button again, and go up. When you see the green gate, leave the the disk there (because there are lasers further up that disintegrate the green disk) and go up by yourself.
Push the red button up there and then go back down to the green disk. Take that disk through the path you just opened up and place it in that station. You’ll then receive a second set of visions, with an apparent science experiment gone wrong as the meteor that causes the extinction of dinosaurs pummels toward the earth. The mysterious messenger will then talk about life support, leaving you more confused. (Use the picture below for reference – follow the red lines with just your sub, follow the green lines with the disks. Circles on the lines are where you start, triangles are where you stop.)
Now, go back down and go back to where you saw that ginormous creature in its cage. There’s just one problem: the creature has broken out. Well, this isn’t good!

Follow the path that the serpent opened up to you. After seeing peeks of it through the cracks on the wall, you’ll find yourself faced with yet another green button. In order to get past this one, you’ll need pretty quick reflexes.
Push the disk towards the right, towards the big hole in the wall, yet careful not to be too close yourself. When you see the monster come to collect a power disk snack, back away and let it eat the disk. When it closes its mouth, quickly speed past the creature and then you’ll find yourself faced with a red button. Press it and one of the gates will open up.
Go back to the green button and summon another green disk. This time, go around from the way you came into this serpent infested area and go down the newly opened path. Then push the red button and go downward again with the disk, where you’ll find the last power docking station.

Put the green power disk in and you’ll be treated to a last set of visions, featuring the spaceship seen before crash into the water, and it turns out to be a familiar silhouette: it’s the place you’re inside at this very moment. After that onslaught of revelation, you’ll find an alien sphere next to you power up and scan you, with the mysterious messenger requesting you to find it.
Follow the sphere out of the serpent area and then go back to where you had to push all those buttons. You’ll find that the door up there is unlocked. As you head on up, you’ll find a hologram of a galaxy, and you’ll rethink the possibility of this place being Atlantis. Instead, it’s something more sci-fi than fantasy…

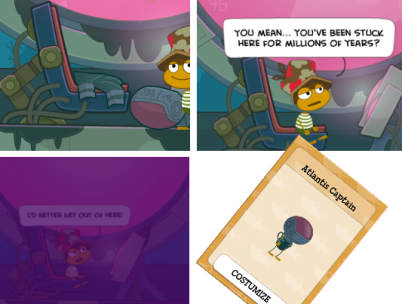
Go through the originally closed off entrance and head on up. At first you think you’ll see someone there, but it turns out to just be a pile of clothes. You can keep them as a costume though.
Click on the panel next to where you found the costume, and it’ll recap all of your visions all at once. You put them all together and you find out that the aliens within this mechanism have been stuck underwater ever since the extinction of dinosaurs millions of years ago. Now that you’ve finally powered up their spaceship, they can finally go home.
Suddenly, the spaceship starts activating around you and you find that you have to get out of here, now. Go back down and go to the left where you started your adventure. You’ll beg the aliens inside the spaceship to let you go home too. Luckily, these aliens are friendly and are grateful for you helping them, so they teleport you away.

Meanwhile, back on the S.S. Medusa, it’s just like any other day on the ship… except for the giant spaceship that just so happens to fly out of the sea. The workers look on, aghast, as the spaceship flies off into deep black space.

You’ll be teleported back onto the S.S. Medusa, where you’ll find a baffled Cam Jameson wondering what the heck happened and being disappointed that he didn’t catch it on tape. Also, you’ll finally get the last medallion for Mission Atlantis. Congratulations! You’ve completed the entire island!


Okay so Im at the end of episode 2 and have they key lined up. I pressed the first one and a yellow light started circling it. It wont stop and I dont if I X out it makes me restart and it does the same thing. What now?
Examine the files and click the glyphs in the correct order. then the door eats you,.;
That is what is supposed to happed
Pingback: Comics, Apps, & More on Poptropica’s Birthday | Poptropica Tips For Poptropicans